
Install Kali Linux on Virtual Box latest version


How to install kali linux correctly inside a virtual machine, Kali Linux is a Debian-based Linux distribution oriented to various information security tasks, such as penetration testing, security research, computer forensics and reverse engineering.
Kali Linux is the undisputed industry standard open source penetration testing platform.
There are many Linux distributions available, and although we must pay attention to certain aspects, the virtualization process for each distribution is very similar. Therefore, in this article we will focus on reviewing the process of creating and installing Kali Linux in a virtual machine, and in another article we will explain in more detail how to configure the Internet connection and other aspects of this secure distribution. The Internet.
YOU CAN ALSO READ: HOW TO INSTALL KALI LINUX ON VMWARE
Create a virtual machine using Kali Linux in VirtualBox
To start the procedure, two things will be necessary, firstly the Hypervisor, in this case it will be VirttualBox and an ISO image of Kali Linux to proceed with its installation.
- We will use the VirtualBox 6.0 version, which we can download from this link
- We will also use the latest version of Kali Linux available which is 2018.4 in its 64-bit version. Download it from its official website
With everything ready, we will open VirtualBox and, located in the main screen, we will click on ?Machine -> New? to start the creation of this VM.
We recommend clicking on the button below ?Expert mode? to obtain all the configuration options of the virtual machine.

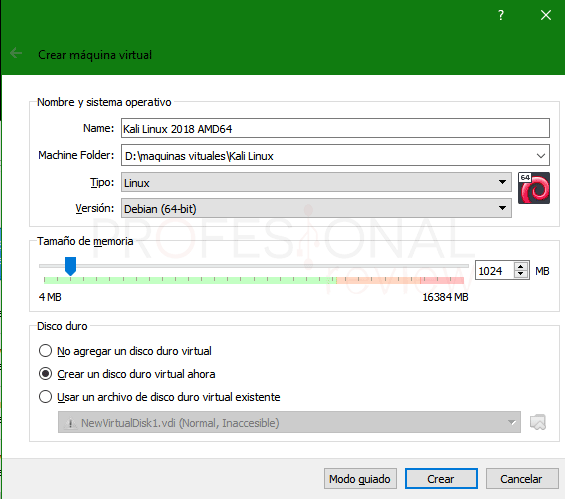
Well, let's name it and then choose the type of Linux system and version of Debian (64 bits), because our system is based on Debian.
We will also put the amount of RAMIf you have more memory, we will use the minimum required, which is 1024 MB, but if you have more memory, put at least 2 GB.
Finally, we choose the option "Create virtual hard disk now"because the virtual machine will be created from scratch. After finishing, everything is as we wish, click on "Create".
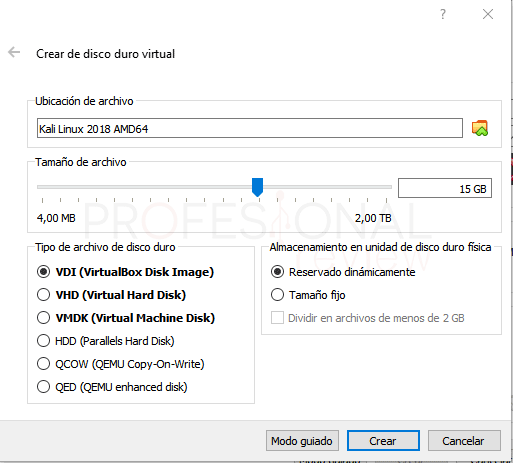

In the next screen we will have to select the virtual hard disk storage space. As before, we will use the minimum requirement, which is 15 GB. Again, we recommend that if you want to actively use the system, select more space to avoid insufficient space, at least 25 GB.
As the format of the virtual hard disk, we keep it in VDI by default, and select the option "Dynamic reserve" so that when we use the hard disk, the actual hard disk space is dynamically allocated. When finished, click on "Create.
Configuring Kali Linux virtual machine in VirtualBox
Of course, before installing the operating system, we will have to select the ISO image to place it in the virtual CD reader so that the system can be installed.
Click on the created virtual machine and select the option "Configuration".

The first change we will make will be remove the floppy disk from the boot list in the section ?General? since we don't want it at all. In principle, we will not have to activate the EFI option for the BIOS, because it will only give us problems.

In the ?System? select the use of two cores of our processor, if we have more or we want to assign them all, go ahead. We will get more speed if we are going to give an intense use to the distro.

Now we will go straight to the ?Storage? to select our virtual CD player and click on the disk icon on the right side of the screen. Select the ISO image of Kali Linux wherever we have stored it during the download.

In the network section, we will leave it as it is for the time being, i.e, in NAT mode to access the Internet through our physical equipment. In a following article, we will see how to configure this aspect in more detail, in case it does not give any problem at first.

We proceed to start the virtual machine to install the operating system.
Installation process of Kali Linux 2018.4
The wizard is quite similar to that of all Debian-based distributions. We start by selecting the ?Graphical install? if we want it with GUI.

We select our installation language and accept the warning that the translation will not be complete.

Now we have to put the computer name, which is very important to identify the computer in the network, so we put a computer name so we can familiarize ourselves with it if necessary.

We were then asked if the machine will be located on a network under a certain domain, for example, with Active Directory, or simply because we have an active domain. Since we are in a familiar environment, there is nothing we can do.

In the new window we will enter the root user password. This user will be the active user of this machine in the system, that is to say, we will always be the root user, reason why to guarantee your security, we will have to enter a good password, as 1234 ... or don't login.

Now we enter the configuration of the installation mode to be executed. We will not complicate things, we will choose the "boot" mode, in which we will use the entire hard disk. After all, it is a virtual machine.

We will also choose to have all files in the same partition, although we can choose the system to create three partitions if we want to install ////. home, / var and / tmp in different partitions.

We will show you a summary of the action to be performed. In any case, by default, Linux always specifies 1 GB of space for virtual memory or swap. It will be fixed.

Before starting the file installation process, we will be asked if we want to make a network replication, generally for program updates. We choose that we do want to do it, we are not going to lose anything.
At this point, if we do not have an active network, we will be shown an error message. Not to worry, because after making sure that the network card is active in the VM, we can repeat the process later to make this option appear.

Finally, we will be asked if we want to install grub to manage the startup of the virtual machine. We recommend that you install it in case we encounter problems in the future or wish to modify this sequence with another system.

Of course, we choose the active system partition, which is where we want to install Kali Linux.

Finally, the process will be executed and then our virtual machine will start. We must remember that the default user will be the root user and the password we entered earlier in the wizard.

Resources:
Installation Video Tutorial:


Leave a Reply Cancel reply
You must be logged in to post a comment.